原文:ConstraintLayout layouts
作者:Mark Allison 、 Sebastiano Poggi
本文将列举讲述如何使用 ConstraintLayout 来代替常见的三种布局 LinearLayout 、 RelatvieLayout 、 PercentLayout 的用法,本文使用的 Android Studio 都是 2.4 alpha 7 版本的,而 ConstraintLayout 库是使用的 1.0.2。
目录:
- [译] ConstraintLayout基础系列之约束(constraints)
- [译] ConstraintLayout基础系列之Chains链
- [译] ConstraintLayout基础系列之参照线guidelines
- [译] ConstraintLayout基础系列之尺寸横纵比 dimensions
- [译] ConstraintLayout深入系列之代替常见布局
- 【译】ConstraintLayout深入系列之中心点对齐
LinearLayout
浮动对齐特性
LinearLayout 的基本用法就是将子组件 View 在水平或者垂直方向浮动对齐,基于属性 orientation 来设置。在视图编辑器中使用 ConstraintLayout 要实现这个特性非常简单,假如要实现相同的垂直方向浮动对齐,步骤很简单,就是添加 View 然后将每一个 View 的上边缘添加约束向到它位置上的另一个 View 即可,如下图:
在 XML 中实现浮动对齐特性
在 XML 中实现该特性也仅仅是为每一个 View 实现一个约束属性 app:layout_constraintTop_toBottomOf 到整个浮动布局中在它之前的 View。
<?xml version="1.0" encoding="utf-8"?> |
子组件权重特性
要想创建跟 LinearLayout 类似的 weight 权重特性的话,我们需要创建约束 Chain 链,详细可以看看我的另一篇文章,表现如下图:
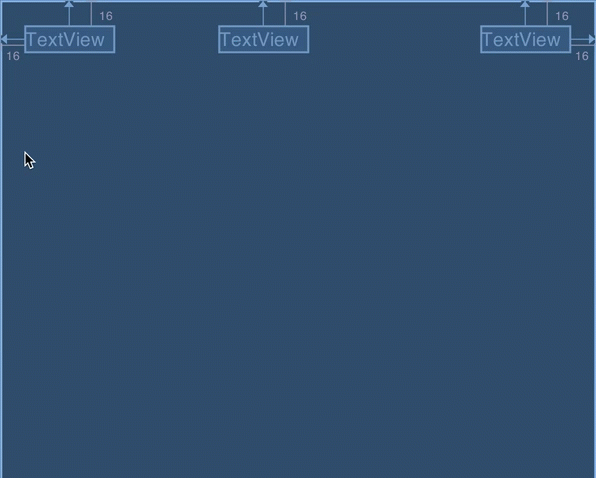
Chain 链创建后,我们只需要在属性视图中为每个需要设置 weight 权重的链组件修改 layout_width 为 match_constraint 或者 0dp (两者是一样的),然后再设置对应的权重值到 weight 的配置属性,因为这个例子中我们使用的是水平的 Chain 链,所以设置权重的时候设置的属性是 horizontal_weight,如下图。
最后,我们就可以再 blueprint 蓝图视图下看到如下的展现:

在 XML 中实现权重特性
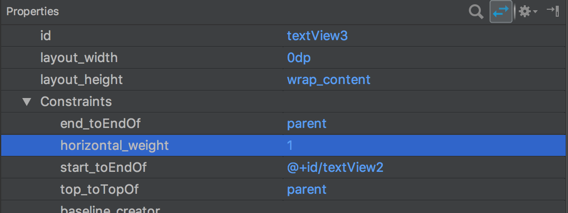
首先要如之前的教程一样,在 XML 创建 Chain 链,然后实现如上的效果只需要对 textView3 修改属性 android:layout_width="0dp" 并且设置新属性 app:layout_constraintHorizontal_weight="1",如下:
|
这里 app:layout_constraintHorizontal_weight 属性设置的值与 LinearLayout 中设置的 android:layout_weight 是一样的值并且用法一样,将会根据所有子组件的设置的权重比分割剩余的空间。
RelativeLayout
RelativeLayout 主要被用于包装布局根据 views 组件之间的关系或与父组件的关系来布局的子 views 。其实如果你对 RelativeLayout 和 ConstraintLayout 都熟悉的话,就会感觉 RelativeLayout 其实只是 ConstraintLayout 的更基础版本,ConstraintLayout 的很多概念来源其实就是 RelativeLayout 。事实上,你还可以认为 ConstraintLayout 就是加强版的 RelativeLayout ,因为你对旧的 Android 布局组件的熟悉,这将是很好的学习了解 ConstraintLayout 的思想体系模型。
在视图编辑器中实现 RelativeLayout
因为 RelativeLayout 就是基于描述各个子 Views 之间的关系,而对各个子 Views 添加约束来实现相同的关系以及展现其实也很相似简易实现。举例,创建布局“ X 位于 Y 之上”的约束就对应于 RelativeLayout 中的 android:layout_above 属性:
相似效果的属性对应表
上面已经提到了 RelativeLayout 和 ConstraintLayout 的基本特性概念非常相似。你可以通过查阅我的另一篇文章来熟悉 ConstraintLayout 的基础,然后使用如下面的表格中对应的属性来转换 RelativeLayout 中的属性到 ConstraintLayout 。
相对父组件
RelativeLayout 属性 | ConstraintLayout 属性 |
|---|---|
android:layout_alignParentLeft="true" | app:layout_constraintLeft_toLeftOf="parent" |
android:layout_alignParentLeft="true" | app:layout_constraintLeft_toLeftOf="parent" |
android:layout_alignParentStart="true" | app:layout_constraintStart_toStartOf="parent" |
android:layout_alignParentTop="true" | app:layout_constraintTop_toTopOf="parent" |
android:layout_alignParentRight="true" | app:layout_constraintRight_toRightOf="parent" |
android:layout_alignParentEnd="true" | app:layout_constraintEnd_toEndOf="parent" |
android:layout_alignParentBottom="true" | app:layout_constraintBottom_toBottomOf="parent" |
android:layout_centerHorizontal="true" | app:layout_constraintStart_toStartOf="parent" 和 app:layout_constraintEnd_toEndOf="parent" |
android:layout_centerVertical="true" | app:layout_constraintTop_toTopOf="parent" 和 app:layout_constraintBottom_toBottomOf="parent" |
android:layout_centerInParent="true" | app:layout_constraintStart_toStartOf="parent", app:layout_constraintTop_toTopOf="parent", app:layout_constraintEnd_toEndOf="parent", 和 app:layout_constraintBottom_toBottomOf="parent" |
这里要注意,相对父组件的居中没有一对一即是只用一条属性能设置同样效果的,而是通过设置相同的约束条件到相对的两个边缘来实现。水平居中,意味着需要设置两个相同的约束条件到水平的左和友边缘对齐父组件,而垂直居中,则是需要设置两个相同的约束条件到垂直的上下边缘对齐父组件,自然而然的在两个方向上都居中的话,则是需要设置两对相同的约束条件在水平和垂直方向,即是四个约束条件对齐。提醒一下大家,在这里可以通过设置约束条件的 bias 来设置 View 组件垂直或水平对齐到父组件的百分比位置,如下图所示:
对齐到其他 View 组件边缘或者基线
RelativeLayout 属性 | ConstraintLayout 属性 |
|---|---|
android:layout_toLeftOf | app:layout_constraintRight_toLeftOf |
android:layout_toStartOf | app:layout_constraintEnd_toStartOf |
android:layout_above | app:layout_constraintBottom_toTopOf |
android:layout_toRightOf | app:layout_constraintLeft_toRightOf |
android:layout_toEndOf | app:layout_constraintStart_toEndOf |
android:layout_below | app:layout_constraintTop_toBottomOf |
android:layout_alignLeft | app:layout_constraintLeft_toLeftOf |
android:layout_alignStart | app:layout_constraintStart_toStartOf |
android:layout_alignTop | app:layout_constraintTop_toTopOf |
android:layout_alignRight | app:layout_constraintRight_toRightOf |
android:layout_alignEnd | app:layout_constraintEnd_toEndOf |
android:layout_alignBottom | app:layout_constraintBottom_toBottomOf |
android:layout_alignBaseline | app:layout_constraintBaseline_toBaselineOf |
这里提醒一下大家,很多 ConstraintLayout 能够实现的约束条件在 RelativeLayout 中不能实现,比如对齐 View 的基线到另一个 View 的上或者下边缘。之所以没有列出来也是因为 RelativeLayout 中并没有相对应的属性实现。
Constraint 约束对于不显示的 GONE Views
RelativeLayout 实现的属性中,ConstraintLayout 没有实现的属性只有一个 android:layout_alignWithParentIfMissing ,这个属性将会让 View 组件能够在对齐对象不显示 GONE 的时候,对齐到父组件。举个例子,如果 A View 需要设置左对齐到toRightOf另一个 View (这个就命名为 B ) ,当B不显示的时候,就会左边对齐到父组件。
ConstraintLayout 在这点上跟 RelativeLayout 或者说大多数布局都不同,它会考虑显示为 GONE 的组件的位置并且针对不显示任何东西的 View 的约束 Constraint 仍然有效。唯一的缺陷是这个 GONE 的 View 的宽高是 0,而且外边距 margin 也被忽略不考虑。
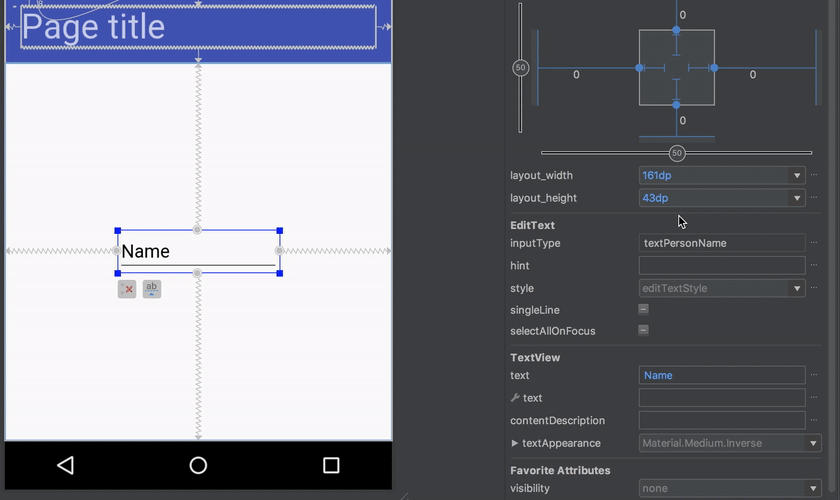
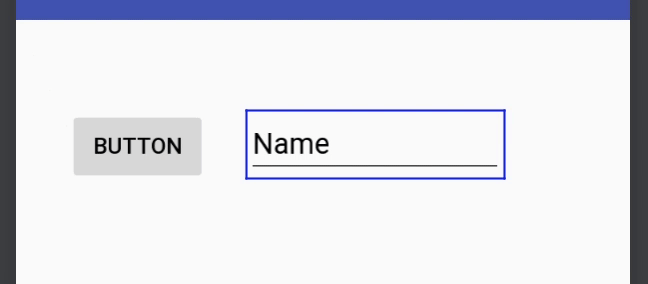
为了适应这种场景的情况下,ConstraintLayout 拥有一个属性 app:layout_goneMargin[Left|Start|Top|Right|End|Bottom] 可以用于当约束对象是一个 GONE View 的时候,设置外边距 margin 。在下面的例子中,当按钮消失 gone 的时候,原本存在于输入框对按钮的属性 start_toEndOf 的 24dp 的外边距启用了另一个属性 app:layout_marginGoneStart="56dp" ,如下动态图所示:
PercentLayout
PercentLayout 通常被用于响应式布局设计,当需要根据父组件来缩放子组件到百分比的情况。
相对父组件的百分比宽高
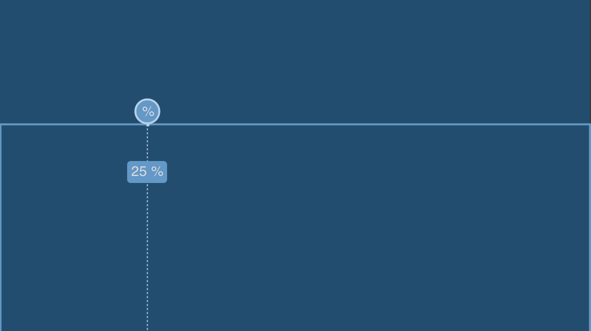
首先我们要看的特性是,子组件要实现占据父组件的宽度或者高度的固定百分比。它在 PercentLayout 中是通过属性 app:layout_widthPercent 和 app:layout_heightPercent 来实现的(此处的命名空间 app 是因为 PercentLayout 的库引入是来自于 support library)。要实现该特性的话,我们可以通过 ConstraintLayout 中的 Guidelines 参照线来实现。假如我们需要实现 app:layout_widthPercent="25%" 的特性,我们可以首先创建一个参照线,移动到 25% 处:
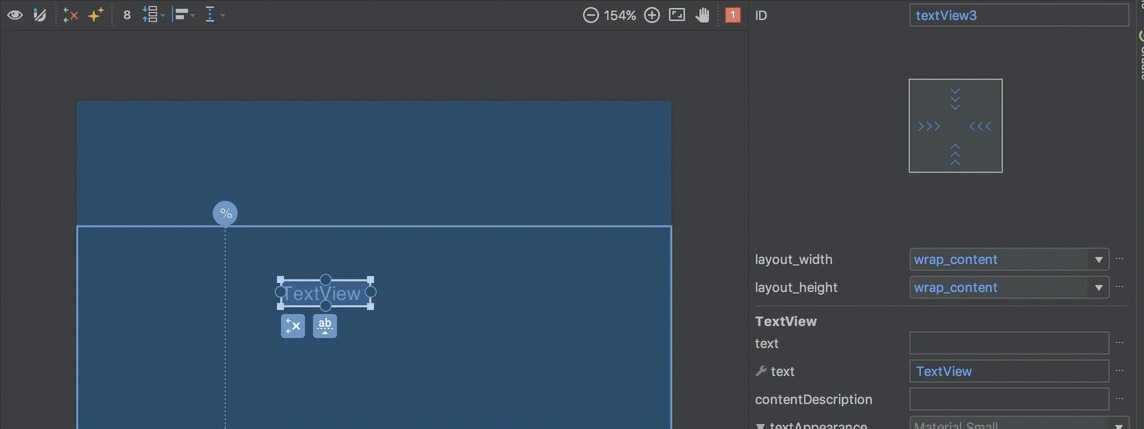
然后我们就需要创建一个 View 将它的创建约束到父组件的 start 边缘以及 end 约束到参照线。在此处,我们没有使用 left 而使用 start 是为了更友好的支持 RTL 语言(从右到左布局,right to left)
同时,我们还需要注意的是我们需要设置 android:layout_width 是被设置成了 0dp 或者 match_constraint(源码层面,他们是一样的)。然后移除这个 View 的外边距,那么这个 View 的宽度就会自动设置成父组件的 25% ,进一步操作如下图所示:

在 XML 中实现百分比宽高
以上例子的 XML 源码如下:
|
实际上真正对齐百分比宽高是由 Guidline 完成的,百分比宽的 TextView 只是创建了一个约束到参照线 Guideline就能实现固定的百分比宽高。
相对父组件的百分比外边距 margin
PercentLayout 还可以让我们实现相对于父组件的百分比外边距 margin 。相比上面百分比宽高的例子,我们一样需要在指定百分比位置设置一个 Guideline参照线,但不是设置 View 的宽度约束到参照线,而是设置 View 的 start 边缘约束到参照线。举个例子,如果我们需要设置的效果是 app:layout_marginStartPercent="25%" ,我们创建一个在 25% 位置的参照线,然后设置 View 的 start 边缘约束到参照线,如下图所示:
然后,在这个例子中我们还设置这个 View 的宽度 android:layout_width="wrap_content" ,然后移除各个方向的外边距 margin ,然后 View 就会有相对于父组件的 25% 宽度外边距 margin。
在 XML 中实现百分比外边距
在 XML 中,参照线 Guidline 是跟上面的例子一样的设置,如下:
|
区别在于,我们的 View 如何设置约束到这个参照线,在这个例子,我们需要设置 app:layout_constraintStart_toStartOf="@+id/guideline" 然后如上面编辑器中说的一样设置 android:layout_width 为 wrap_content 和 android:layout_marginStart 为 0dp 。
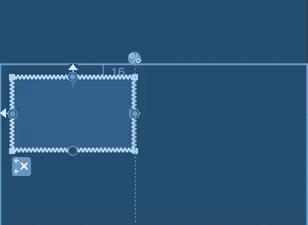
实现固定横纵比布局
最后一个特性就是实现 PercentLayout 的横纵比特性,通过它可以让高度固定比例为宽度的函数,或者反过来。关于 ConstraintLayout 如何实现横纵比尺寸,我有另一篇文章 更详细的讲解了这个特性。首先我们设置一个固定的比例,然后设置这个 View 的宽高为 match_constraint 或 0dp :
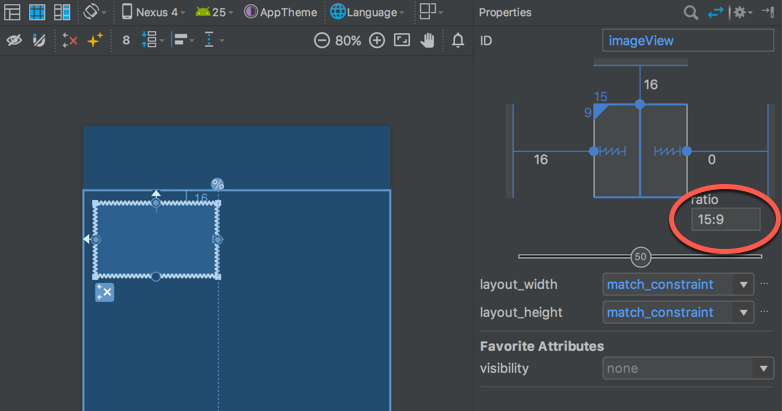
然后我们设置好水平方向的两个约束条件,然后至少保留一个垂直方向的约束不设置,那么我们的组件 View 高度就会是依赖于宽度的函数,然后通过移动参照线来缩放 View 的宽度的时候就会发现高度也会相应的根据函数变化。
在 XML 中设置横纵比布局
在 XML 中,真正设置了宽高比的属性是 app:layout_constraintDimensionRatio 为想要的值,其他规则跟在视图编辑器中是一样的。
|
最后提醒一下,没懂的小伙伴可以看看另一篇文章 ConstraintLayout基础系列之尺寸横纵比 dimensions。
- 本文作者: Amos Zhong
- 本文链接: https://biaomingzhong.github.io/2017/constraintlayout-layouts-common/
