原文:ConstraintLayout basics guidelines
作者:Mark Allison
什么是参照线 guidelines
如果你熟悉 UI 设计软件你应该已经使用过参照线 guidelines 并对它的作用熟悉了。参照线 guideline 提供了视觉上的参照用于 Views 的对齐,而且不会在运行的时候显示,只要你熟悉它的使用了就会发现它对你的对齐实现非常方便。 Google 的 Material 设计原则推荐了使用 keylines 。该文章将介绍如何通过参照线 guidelines 来快速实现这些。
目录:
- [译] ConstraintLayout基础系列之约束(constraints)
- [译] ConstraintLayout基础系列之Chains链
- [译] ConstraintLayout基础系列之参照线guidelines
- [译] ConstraintLayout基础系列之尺寸横纵比 dimensions
- [译] ConstraintLayout深入系列之代替常见布局
- 【译】ConstraintLayout深入系列之中心点对齐
创建参照线 guidelines
创建垂直参照线 guidelines 需要在 blueprint 视图上右键打开上下文菜单,然后选择 Add Vertical Guideline 即可创建。如下图所示:
当前版本的视图编辑器(Android Studio 2.4 alpha 7)默认隐藏参照线,选择 blueprint 内的 View 即可看到参照线。
参照线 guidelines 的类型
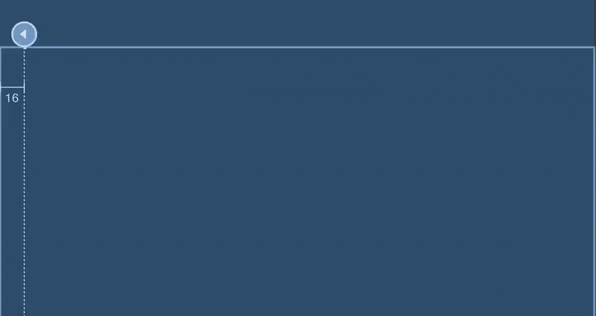
当前的参照线 guidelines 有三种类型,默认的第一种参考线是会有一个固定的偏移向父组件的 start 边缘(偏移量的单位是 dp)。本文开头创建的参照线对于父组件的 start 边缘参考线为 16dp。为了适配从右向左的布局设置,所以我们应该采用 start 边缘而不是 left 边缘。
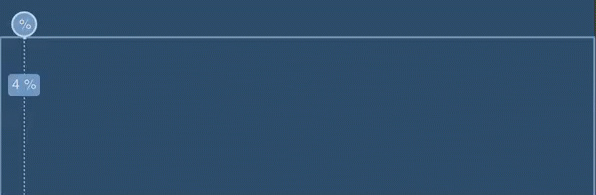
第二种参考线则是有一个固定的偏移向父组件的 end 边缘。而最后一种参考线是根据父组件 ConstraintLayout 的宽度百分比来放置,而且参照线存在一个标识器,可以通过点击这个标识按钮来切换参考线的类型,如下图所示:
向 start 和 end 类型的偏移量参照线非常适用于 keylines 的使用场景,而百分比形式的参照线则提供了类似于 PercentLayout 的一些功能。
调整参照线 guidelines
只要已经创建了参照线,我们可以通过拖动除类型标志器以外的地方的参照线来移动。
你可以在例子中看到,对于一些特殊位置,如左右方向的 8dp 偏移量以及居中的 50% 位置,会对参照线有吸引力。
正确的使用参照线 guidelines
到此,我们已经知道参照线 guidelines 的所有类型以及如何创建和移动,现在要讨论一下参照线对于我们的用途,用它来作为其他 views 的约束 constraint 对象,也就是说我们可以创建从 view 的一个锚点到参照线的约束 constraint 对象来根据参照线来对齐这个 view。然后如果我们移动参照线,受约束的 view 也会跟着一起移动:
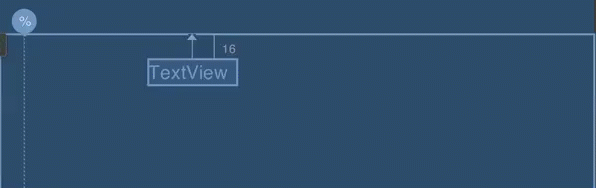
这个特性其实很强大,例子中只有一个 view 约束指向了参照线,但如果我们有多个 views 约束指向到参照线,移动会让所有的 views 跟着一起动。
参照线 Guideline 实现原理
对于喜欢追根寻底的开发者,我们可以更深一步看看 Guideline 的内部实现。源码中 Guideline 类其实就是一个 View,而且它不会渲染任何东西因为它实现了一个 final 的 onDraw() 而且固定了它的可见性为 View.GONE ,这就决定了运行时不会显示任何东西,而在 View 的 layout 布局过程中它会占据一个位置,而其他组件可以通过它来布局对齐。所以实际上的 Guideline 只是一个极其轻量级没有任何显示但是可以用于约束布局对齐的 View 组件。
在 XML 中的 Guideline
我们可以看看一个 View 约束对齐到参照线的例子:
<?xml version="1.0" encoding="utf-8"?> |
参照线 Guideline 拥有了一个属性 app:orientation="vertical" 来描述它是一个垂直的参照线(此处也可以设置为 horizontal)。它还有属性 app:layout_constraintGuide_begin="16dp" 来描述它是一个对齐父组件的 start 边缘的 16dp 偏移量处。再次提醒的是,应该用 start 边缘而不是 left 边缘。当然切换向 end 类型的话,可以使用另一个属性 app:layout_constraintGuide_end="..." ,切换为百分比类型的参照线则是设置属性 app:layout_constraintGuide_percent="0.5" 值得取值范围为 0.0 到 1.0,描述的是百分比偏移量。
而此处的 TextView 源码则表现了,我们可以从 TextView 像对其他 View 一样对 Guideline 添加约束向量,这样的原因就是刚刚分析的原理,因为 Guildeline 就是一个特殊的 View 。
- 本文作者: Amos Zhong
- 本文链接: https://biaomingzhong.github.io/2017/constraintlayout-basics-guidelines-3/
