上一篇博客,分享了 android studio ndk-build 编译C生成.so文件
这一篇文章和大家分享一下,用cMake脚本文件添加ndk,来构建C/C++程序。
一、概要
Android Studio 用于构建原生库的默认工具是 CMake,由于很多现有项目都使用构建工具包编译其原生代码,Android Studio 还支持 ndk-build。如果您想要将现有的 ndk-build 库导入到您的 Android Studio 项目中,请参考上一篇文章:android studio ndk-build 编译C生成.so文件, 不过,如果您在创建新的原生库,则应使用 CMake。
注意:至于ndk的现在和构建工具的配置:上一篇文章:android studio ndk-build 编译C生成.so文件 中已经介绍过了,这里就不累赘了。
这篇博客主要是介绍两部分内容:
- 创建支持C/C++的新项目
- 向现有的项目添加C/C++ 代码
二、创建支持C/C++的新项目
创建支持原生代码的项目与创建任何其他 Android Studio 项目类似,不过前者还需要额外几个步骤:
- 在向导的 Configure your new project 部分,选中 Include C++ Support 复选框。
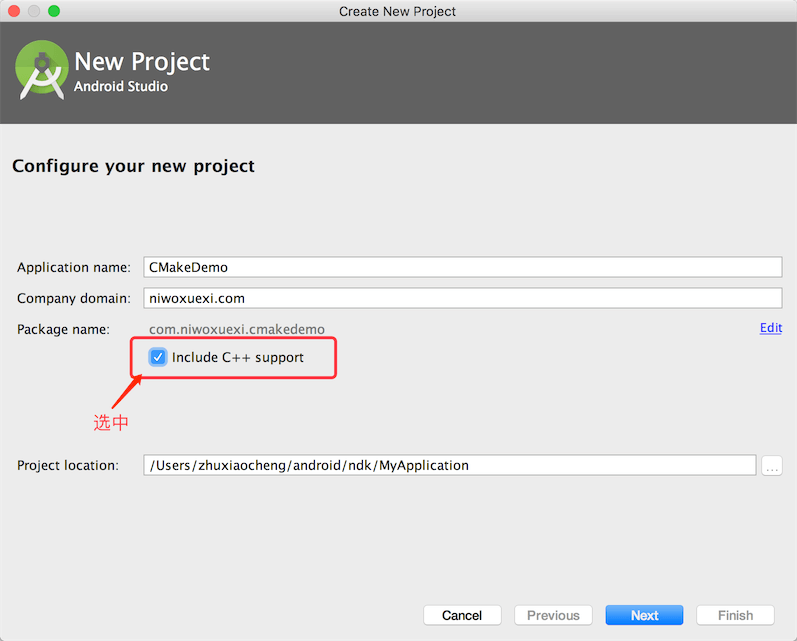
- 点击 Next。
- 正常填写所有其他字段并完成向导接下来的几个部分。
- 在向导的 Customize C++ Support 部分,您可以使用下列选项自定义项目:

- C++ Standard:使用下拉列表选择您希望使用哪种 C++ 标准。选择 Toolchain Default 会使用默认的 CMake 设置。
- Exceptions Support:如果您希望启用对 C++ 异常处理的支持,请选中此复选框。如果启用此复选框,Android Studio 会将
-fexceptions标志添加到模块级 build.gradle 文件的 cppFlags 中,Gradle 会将其传递到 CMake。</li><li><strong>Runtime Type Information Support</strong>:如果您希望支持 RTTI,请选中此复选框。如果启用此复选框,Android Studio 会将 <code>-frtti 标志添加到模块级 build.gradle 文件的 cppFlags 中,Gradle 会将其传递到 CMake。
- 点击 Finish。
在 Android Studio 完成新项目的创建后,请从 IDE 左侧打开 Project 窗格并选择 Android 视图。如图 下图 2-1 所示,Android Studio 将添加 cpp 和 External Build Files 组。Project 视图如下:2-3所示。

图 2-1
点击 Run 先运行项目看效果:如下图 2-2 ,在 app/build/intrmediates/cmake/debug/obj下面可以看到libnative-lib.so文件了,如下图: 2-3
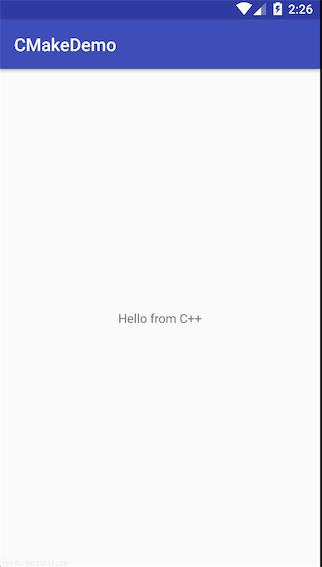
图 2-2
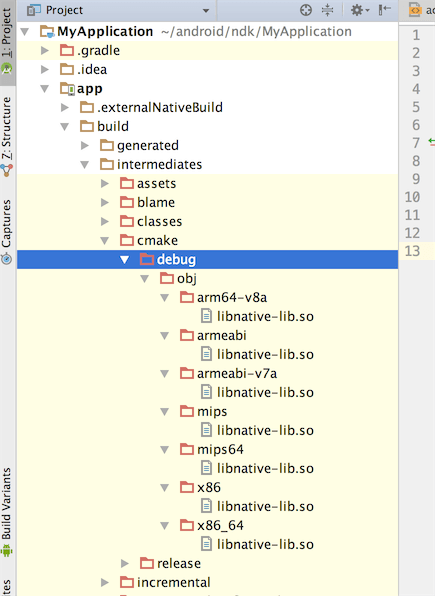
图: 2-3
我们再分析一下跟我们平时开发不带ndk的项目的不同点
主要有四个改变:如下图所示:
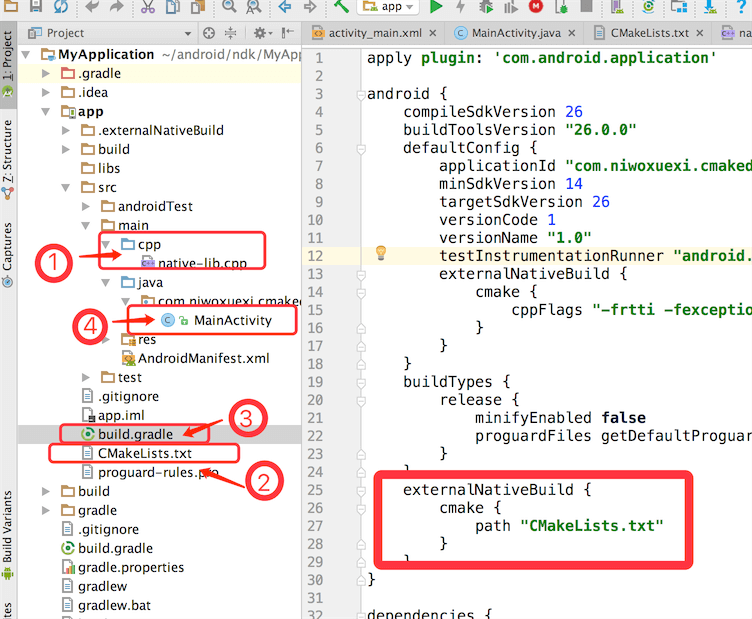
1,native-lib.cpp代码如下:
#include <jni.h>
#include <string>
extern "C"
//注意函数名的命名方式: 1,包名 + 类名 + 方法名 2,'-'连接符
JNIEXPORT jstring JNICALL Java_com_niwoxuexi_cmakedemo_MainActivity_stringFromJNI(
        JNIEnv *env,
        jobject /* this */) {
    std::string hello = "Hello from C++";
    return env->NewStringUTF(hello.c_str());
}
2,CMakeLists.txt脚本文件
# For more information about using CMake with Android Studio, read the
# documentation: https://d.android.com/studio/projects/add-native-code.html
# Sets the minimum version of CMake required to build the native library.
cmake_minimum_required(VERSION 3.4.1)
# Creates and names a library, sets it as either STATIC
# or SHARED, and provides the relative paths to its source code.
# You can define multiple libraries, and CMake builds them for you.
# Gradle automatically packages shared libraries with your APK.
add_library( # Sets the name of the library.
             native-lib
             # Sets the library as a shared library.
             SHARED
             # Provides a relative path to your source file(s).
             src/main/cpp/native-lib.cpp )
# Searches for a specified prebuilt library and stores the path as a
# variable. Because CMake includes system libraries in the search path by
# default, you only need to specify the name of the public NDK library
# you want to add. CMake verifies that the library exists before
# completing its build.
find_library( # Sets the name of the path variable.
              log-lib
              # Specifies the name of the NDK library that
              # you want CMake to locate.
              log )
# Specifies libraries CMake should link to your target library. You
# can link multiple libraries, such as libraries you define in this
# build script, prebuilt third-party libraries, or system libraries.
target_link_libraries( # Specifies the target library.
                       native-lib
                       # Links the target library to the log library
                       # included in the NDK.
                       ${log-lib} )
3, build.gradle 文件中引入CMake脚本
externalNativeBuild {
    cmake {
        path "CMakeLists.txt"
    }
}
4,MainActivity中引入和使用so库
public class MainActivity extends AppCompatActivity {
    // Used to load the 'native-lib' library on application startup.
    //加载so库
    static {
        System.loadLibrary("native-lib");
    }
    @Override
    protected void onCreate(Bundle savedInstanceState) {
        super.onCreate(savedInstanceState);
        setContentView(R.layout.activity_main);
        // Example of a call to a native method
        TextView tv = (TextView) findViewById(R.id.sample_text);
        //调用native方法
        tv.setText(stringFromJNI());
    }
    /**
     * A native method that is implemented by the 'native-lib' native library,
     * which is packaged with this application.
     *
     * 注意:java 调C中的方法都需要用native声明且方法名必须和c的方法名一样
     */
    public native String stringFromJNI();
}
下面的概览介绍了构建和运行示例应用时会发生的事件:
- Gradle 调用您的外部构建脚本
CMakeLists.txt。 - CMake 按照构建脚本中的命令将 C++ 源文件
native-lib.cpp编译到共享的对象库中,并命名为 libnative-lib.so,Gradle 随后会将其打包到 APK 中。 - 运行时,应用的
MainActivity会使用 System.loadLibrary() 加载原生库。现在,应用可以使用库的原生函数 stringFromJNI()。 MainActivity.onCreate()调用 stringFromJNI(),这将返回“Hello from C++”并使用这些文字更新 TextView。
说了这么多,最好上代码:项目下载请点击我哦
三、向现有的项目添加C/C++代码
如果你想向现有的项目添加原生代码,请看下面的步骤
- 创建新的原生源文件cpp文件夹以及源文件 并将其添加到您的 Android Studio 项目中。
- 创建 CMake 构建脚本,将您的原生源代码构建到库中。
- 提供一个指向您的 CMake ,将 Gradle 关联到您的原生库。Gradle 使用构建脚本将源代码导入您的 Android Studio 项目并将原生库(SO 文件)打包到 APK 中。
配置完项目后,您可以使用 JNI 框架从 Java 代码中访问您的原生函数。要构建和运行应用,只需点击 Run  。Gradle 会以依赖项的形式添加您的外部原生构建流程,用于编译、构建原生库并将其随 APK 一起打包。
1, 创建新的原生源文件
要在应用模块的主源代码集中创建一个包含新建原生源文件的 cpp 目录,请按以下步骤操作:
- 从 IDE 的左侧打开 Project 窗格并从下拉菜单中选择 Project 视图。
- 导航到 您的模块 > src,右键点击 main 目录,然后选择 New > Directory。
- 为目录输入一个名称(例如
cpp)并点击 OK。 - 右键点击您刚刚创建的目录,然后选择 New > C/C++ Source File。
- 为您的源文件输入一个名称,例如
native-lib。 - 从 Type 下拉菜单中,为您的源文件选择文件扩展名,例如
.cpp。- 点击 Edit File Types
 ,您可以向下拉菜单中添加其他文件类型,例如
 .cxx或 .hxx。在弹出的 C/C++ 对话框中,从 Source Extension 和 Header Extension 下拉菜单中选择另一个文件扩展名,然后点击 OK。
- 点击 Edit File Types
- 如果您还希望创建一个标头文件,请选中 Create an associated header 复选框。
- 点击 OK。
native-lib代码如下(也可以通过ndk-build 自动生成头文件,再编写,请参看上一篇文章: android studio ndk-build 编译C生成.so文件):
#include <jni.h>
#include <string>
extern "C"
//注意函数名的命名方式: 1,包名 + 类名 + 方法名 2,'-'连接符
JNIEXPORT jstring JNICALL Java_com_niwoxuexi_cmakedemo_MainActivity_stringFromJNI(
        JNIEnv *env,
        jobject /* this */) {
    std::string hello = "Hello from C++";
    return env->NewStringUTF(hello.c_str());
}
2, 创建 CMake 构建脚本
CMake 构建脚本是一个纯文本文件,您必须将其命名为 CMakeLists.txt。 我把他放在项目app的根目录,(或者其他的地方也可以,注意下面关联Cmake脚本文件的时候,选择你所放置的路径)
我们先上代码:
# Sets the minimum version of CMake required to build the native library.
cmake_minimum_required(VERSION 3.4.1)
# Creates and names a library, sets it as either STATIC
# or SHARED, and provides the relative paths to its source code.
# You can define multiple libraries, and CMake builds them for you.
# Gradle automatically packages shared libraries with your APK.
add_library( # Sets the name of the library.
             native-lib
             # Sets the library as a shared library.
             SHARED
             # Provides a relative path to your source file(s).
             src/main/cpp/native-lib.cpp )
# Searches for a specified prebuilt library and stores the path as a
# variable. Because CMake includes system libraries in the search path by
# default, you only need to specify the name of the public NDK library
# you want to add. CMake verifies that the library exists before
# completing its build.
find_library( # Sets the name of the path variable.
              log-lib
              # Specifies the name of the NDK library that
              # you want CMake to locate.
              log )
# Specifies libraries CMake should link to your target library. You
# can link multiple libraries, such as libraries you define in this
# build script, prebuilt third-party libraries, or system libraries.
target_link_libraries( # Specifies the target library.
                       native-lib
                       # Links the target library to the log library
                       # included in the NDK.
                       ${log-lib} )
CMake脚本的语法大家可以从官网查看。
3,将 Gradle 关联到您的原生库
要将 Gradle 关联到您的原生库,您需要提供一个指向 CMake 或 ndk-build 脚本文件的路径。有两种方法,1,用Android Studio UI工具 2,手动配置gradle
1)使用Android Studio UI ,步骤如下:
- 从 IDE 左侧打开 Project 窗格并选择 Android 视图。
- 右键点击您想要关联到原生库的模块(例如 app 模块),并从菜单中选择 Link C++ Project with Gradle。您应看到一个如图 4 所示的对话框。
- 从下拉菜单中,选择 CMake 或 ndk-build。
- 如果您选择 CMake,请使用 Project Path 旁的字段为您的外部 CMake 项目指定
CMakeLists.txt脚本文件。 - 如果您选择 ndk-build,请使用 Project Path 旁的字段为您的外部 ndk-build 项目指定
Android.mk脚本文件。如果 Application.mk 文件与您的 Android.mk 文件位于相同目录下,Android Studio 也会包含此文件。
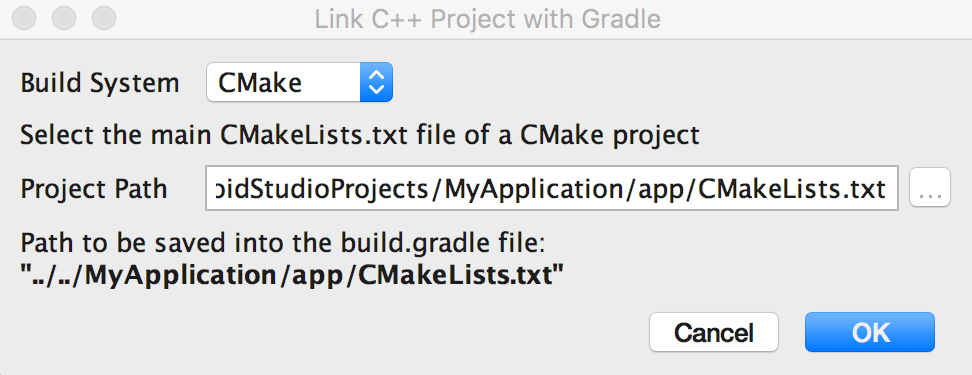
- 如果您选择 CMake,请使用 Project Path 旁的字段为您的外部 CMake 项目指定
- 点击 ok
2)手动配置 Gradle,步骤如下:
要手动配置 Gradle 以关联到您的原生库,您需要将 externalNativeBuild {} 块添加到模块级 build.gradle 文件中,并使用 cmake {}
android {
  ...
  defaultConfig {...}
  buildTypes {...}
  // Encapsulates your external native build configurations.
  externalNativeBuild {
    // Encapsulates your CMake build configurations.
    cmake {
      // Provides a relative path to your CMake build script.
      path "CMakeLists.txt"
    }
  }
}
如果想指定 ABI 可添加如下代码:
android {
  ...
  defaultConfig {
    ...
    externalNativeBuild {
      cmake {...}
      // or ndkBuild {...}
    }
    ndk {
      // Specifies the ABI configurations of your native
      // libraries Gradle should build and package with your APK.
      abiFilters 'x86', 'x86_64', 'armeabi', 'armeabi-v7a',
                   'arm64-v8a'
    }
  }
  buildTypes {...}
  externalNativeBuild {...}
}
4,这时候就可以在代码中引用native-lib.so 包,并调用原生代码了
直接上代码,不解释:
public class MainActivity extends AppCompatActivity {
    // Used to load the 'native-lib' library on application startup.
    static {
        System.loadLibrary("native-lib");
    }
    @Override
    protected void onCreate(Bundle savedInstanceState) {
        super.onCreate(savedInstanceState);
        setContentView(R.layout.activity_main);
        // Example of a call to a native method
        TextView tv = (TextView) findViewById(R.id.sample_text);
        tv.setText(stringFromJNI());
    }
    /**
     * A native method that is implemented by the 'native-lib' native library,
     * which is packaged with this application.
     */
    public native String stringFromJNI();
}
好了,现在你可以运行程序了。
四、总结:
写博客还是很累的事情,有写得不好的地方,还请谅解。啦啦啦.... 今天就这样结束了,结束前好像还缺点儿什么东西, 什么东西呢......
那当然是代码啦:项目下载请点击我哦